I was asked to make a couple of wedding cards recently and this is what I came up with.
The first one is made with a silver peel off with a bit of purple colouring matted on silver mirror card. Finished off with a piece of ribbon and some gems.
The backing paper was from my stash and it is printed vellum. You can't really see it but iot has been edged with a martha Stewart edge punch. The image was embossed using cuttlebug embossing folder and the backing run through the swiss dots embossing folder. A piece of ribbon and some gems and a peel off greeting finished it off.
Thursday, 29 July 2010
Family Birthdays
Over the past week or so I have had made 3 birthday cards for family members.
The card below has been made for my brother on law, Ron. The card is 125mm square. The backing paper is from my stash. The cars are gold peeloffs placed over black paper and cut out. I have used a greeting from craftwork cards and black card candy.
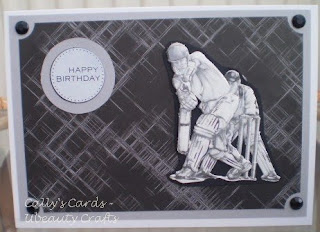
The next card was made for my friend's son. It's a 5ins x 7ins card landscaped. The backing paper is from my stash. The cricket players are decoupaged from a sheet I got from The Range. The greeting is from Craftwork cards as were the card candy.
I love this card. This was made for my great niece. The image is 'peekaboo' from Karensdoodles. It was coloured with promarkers (unfortunately I don't know what colours..opps!!) The backing paper is from my stash. The image and the greeting was matted and layered on nesties. Computer geberated greeting. The flowers were bought from The Works, a bit of ribbon and some gems.
Wednesday, 28 July 2010
Summer Crafting pt 4
This was the first card that we made in Stephanie and Nigel's class. The theme was christmas and it was made similar to a shadowbox card. All the templates had been die cut for us so we just had to cut and stick together.
This is the outside look of the card.
When you open the door there is the littlke girl standing there in the garden in the with snowflakes hanging down. Again we were given enough stuff to make another card.
This is the outside look of the card.
When you open the door there is the littlke girl standing there in the garden in the with snowflakes hanging down. Again we were given enough stuff to make another card.
Summer Crafting pt 3
This was my favourite card of the day and it was done in Melanie Heaton's class. Melanie works for Bramwell's. When we got into the class the first thiong she did was get us to write down the 'receipe' of the card so that we knew what we were doing. The card was made from scratch. It was mainly done by using punches and glue. The flower is made up of 6 large retro daisy punches, sticking 2 together so you end up with 3, then they are curled. The circles were cut using the circle cutter but can easily be done using nesties. The centre of the flower was a smaller punch and a jewel.
Thanks for reading
Summer Crafting Cards - pt 2
The following card was made in the class run by Nancy Watt. The card is an A5 gatefold card that opens into a surprise. We were given the template for the card which we had to cut out and fold. The from gate folds have silver and glitter card matted & layered onto it.
When you open the card up it reveals what could have been an old dance hall in the 1920's. The man and woman are from Nancy's DVD 'Festive Follies' that I have purchased ( at a discount price from the show..). They were cut out and stuck onto folds on the card. In the original card they were decoupaged but i didn't do that. The inside of the gatefolds were matted & layered with silver and glittered card as in the front. The chandalier was printed onto acetate and then cut out with a tag and stuck under the message on the top support. The messgae was printed out. I loved this card and the images (I just love art deco) but it could have been made better. I didn't have my own tools and I messed up a bit, but we do have enough stash to make the card again.
Cards made at The Summer Crafting Workshop Day -Pt 1
I am going to put the cards that I made on separate posts so that I know where I am...
This card was made in the class run by Kim Sutton from B-Craft-e. The card was made from one of Kim's templates called ' 3-d reveal card'. The pictures are of course Beatrix Potter. We were allowed to keep the template so that we can make the card again. The samples that she had were really good but unfortunately as I said in a previous post I lost all my pictures.
The fiorst picture is of it closed:
This picture shows it opened.You can't see it well but you have 3 struts in the card that allow you to create the 3 d effect. Peter Rabbit is sitting on the closest strutt and looks to be running towards the bunny at the back. We also made a 'boxelope' to go with the card. This was made from a template which Kim allowed us to purchase at half the price. The card fits in it exactly. It would also do all your A5 decoupaged cards also as iot gives the extra depth.
Friday, 23 July 2010
Delish Blog Candy
Thursday, 22 July 2010
Weekend in Doncaster.
Last weekend my mate Pam and I drove up to Doncaster for the SummerCrafting show. ( I say we but it was Pam that did all the driving). We left on Thursday and had a slow drive up going via CleverCut and stopped off at a nice place (can for the life of me remember where now though!!) for a nice lunch.
We arrived at the hotel at at 6ish, very impressed with the hotel The Earl. Looks absolutely nothing from the outside but once you got in,, WOW!! I did have some photos of the inside but when I came to download them to the computer, either the camera or the laptop had a wobbly and the pictures were erased. Hopefully Pam may put hes on her blog when she gets sorted...
Friday was workshop day, we were booked onto 4 workshops. We were a bit apprehensive at the beginning cause we didn't know what to expect but what a brilliant day. We did 4 workshops and made a completed card in all of them and came away with the stuff to be able to make another card also. The cards I will post once I have photographed them.
On the Saturday we went round the show itself. To say ot was busy is an huge understatement.. the morning was manic. In hindsite if we go next year we have said that we won't go til the afternoon as we could have gone in on the Sunday also.. We were knackered when we finished, but we had had a good day with lots of bargains. Spent lots of money but then I can shop for England if it was craft stuff. I did have a pic of all my stash but again it was lost when the camera/laptop through a wobbly.
We drove home on Sunday feeling knackered, but iyt had been a great weekend and we will definately be there next year!!
Thanks for reading
Sunday, 11 July 2010
Bev's Blog Candy
Bev has some fab Lily of The Valley Stamps on offer. Pop over to her blog here for your chance to win.
Thanks for reading
Thanks for reading
Monday, 5 July 2010
New cards - still on the monochrome style..
Today I have been making some more cards in monochrome as the previous card was.
The first card is on a square pearlescent card covered in background paper from the Papermania Capsule Collection. The roase is from a sheet that I got from the Range. I have matted it onto black card and cut round the shape freehand. A piece of black ribbon across the corner and the greeting is from Craftwork cards layered on a black card cut from a nestie on the Cuttlebug. I have added some black card candy that also comes from Craftwork cards.
The second card was again using backing sheet from the Papermania capsule collection . The decoupage flowers were from the same sheet as before. The backing card was cut using Nellie multi frame. I have used a Martha Stewart corner punch on the backing paper and added some white gems to the corbers. You can't really see it in the picture. I have added some ribbon and again the greeting is from Craftwork Cards. I have added a couple of gems to the greeting.
Thanks for reading
Saturday, 3 July 2010
Black, white & grey...
Here is a card that I made today, for no particular reason but because I like the effect. Ther card is a 5" x 7" pearlescent card. The background paper comes from Papermania Capsule Collection. The greeting is from Craftwork Cards. The rose is decoupaged and I got this from The Range. The white and black card was from my stash as was the ribbon and gems.
Thanks for reading
Thanks for reading
Subscribe to:
Posts (Atom)